ECS: Project 3
Table of Contents
Introduction
This project is designed to help you gain hands on experience with AWS ECS and AWS Web Application Firewall (WAF). WAF is used to Safeguard applications from web vulnerabilities like SQL injection, XSS attacks, Blocking Malicious IP Addresses, Protecting Against Bot Traffic, Custom Rules for Specific Threats etc.. It is the extended version of Project 1 and Project 2 hence its highly recommended to go through them before this one. Thank you!
Problem Statement
GTUC, an emerging e-commerce platform, has a scalable and secure cloud infrastructure that handles its growing customer base. This infrastructure hosts the platform’s core services, such as the product catalog, ensuring customers can easily browse and access products at any time. Recently, their security team realized that traffic is coming from Nigeria, which is against their security policies, they want to enable reCAPTCHA for all traffic generated from Ghana.
To address these challenges:
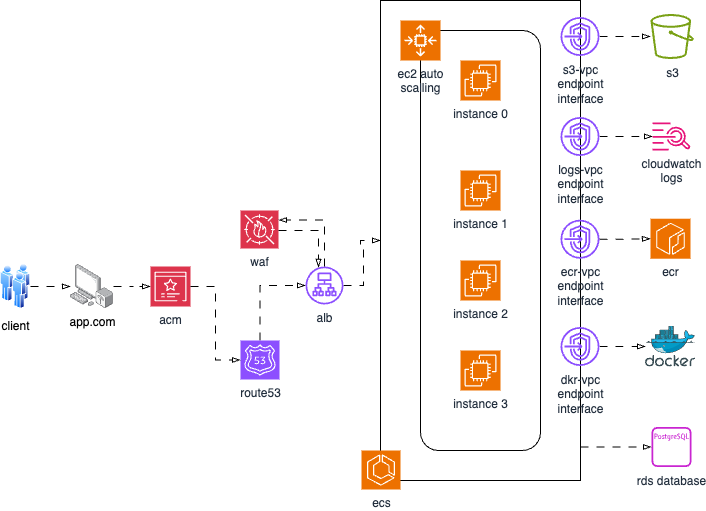
- AWS WAF will be implemented to block traffic originating from Nigeria.
- AWS WAF will be used to enable reCAPTCHA verification for traffic coming from Ghana.
Architectural Diagram

Setup:
Step 1: Create Required IAM Roles
- Create an IAM Role and attach AmazonEC2ContainerServiceforEC2Role policy to it. IAM Role Name: items-ecs-ec2-role
- Create an IAM Role and attach AmazonECSTaskExecutionRolePolicy policy to it. IAM Role Name: items-ecs-task-definition-role
Video for entire steps
Step 2: Network Setup

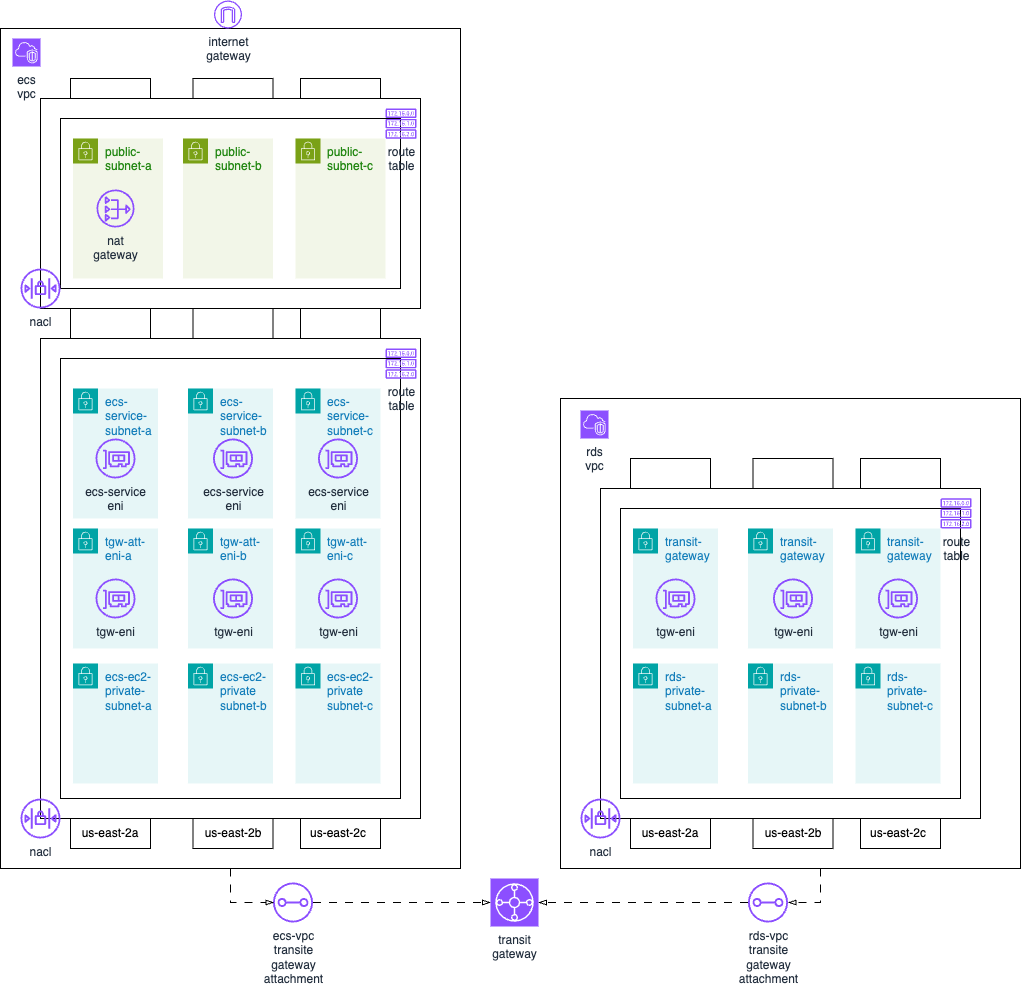
- Create a VPC for ECS, Enable DNS resolution and DNS hostnames
- Name: items-ecs-vpc CIDR 10.0.0.0/16
- Create a VPC for RDS, Enable DNS resolution and DNS hostnames
- Name: items-rds-vpc CIDR 10.1.0.0/16
- Create six(6) Private Subnets in RDS VPC (items-rds-vpc) by selecting the appropriate AZ attached to its name.
- Name: private-us-east-2a-rds CIDR: 10.1.0.0/24
- Name: private-us-east-2b-rds CIDR: 10.1.1.0/24
- Name: private-us-east-2c-rds CIDR: 10.1.2.0/24
- Name: private-us-east-2a-rds-tgw CIDR: 10.1.3.0/24
- Name: private-us-east-2b-rds-tgw CIDR: 10.1.4.0/24
- Name: private-us-east-2c-rds-tgw CIDR: 10.1.5.0/24
- Create nine(9) Private Subnets in ECS VPC (items-ecs-vpc) by selecting the appropriate AZ attached to its name.
- Name: private-us-east-2a-ecs-ec2 CIDR: 10.0.0.0/24
- Name: private-us-east-2b-ecs-ec2 CIDR: 10.0.1.0/24
- Name: private-us-east-2c-ecs-ec2 CIDR: 10.0.2.0/24
- Name: private-us-east-2a-ecs-tgw CIDR: 10.0.3.0/24
- Name: private-us-east-2b-ecs-tgw CIDR: 10.0.4.0/24
- Name: private-us-east-2c-ecs-tgw CIDR: 10.0.5.0/24
- Name: private-us-east-2a-ecs-service CIDR: 10.0.6.0/24
- Name: private-us-east-2b-ecs-service CIDR: 10.0.7.0/24
- Name: private-us-east-2c-ecs-service CIDR: 10.0.8.0/24
- Create three(3) Public Subnets in ECS VPC (items-ecs-vpc) by selecting the appropriate AZ attached to its name and Enable auto assigned public IP address on them.
- Name: public-us-east-2a-ecs CIDR: 10.0.6.0/24
- Name: public-us-east-2b-ecs CIDR: 10.0.7.0/24
- Name: public-us-east-2c-ecs CIDR: 10.0.8.0/24
- Create and attach an internet gateway to ECS VPC (items-ecs-vpc). Name: items-ecs-igw
- Rename the default route table of RDS VPC (items-rds-vpc) to private-items-rds-rtb
- Rename the default route table of ECS VPC (items-ecs-vpc) to private-items-ecs-rtb
- Create a public route table and attach it to ECS VPC (items-ecs-vpc). Name: public-items-ecs-rtb
- Associate RDS private subnet to RDS private route table (private-items-rds-rtb)
- Associate ECS private subnet to ECS private route table (private-items-ecs-rtb)
- Associate ECS public subnet to ECS public route table (public-items-ecs-rtb)
- Edit the public route table of ECS (public-items-ecs-rtb) and allow traffic to 0.0.0.0/0 through the internet gateway
- Create a NAT Gateway by selecting one public ECS subnet. Name: items-ecs-ngw
- Edit the private route table of ECS (private-items-ecs-rtb) and allow traffic to 0.0.0.0/0 through the nat gateway (items-ecs-ngw)
- Rename the default security group of RDS VPC to items-rds-vpc-sg
- Rename the default security group of ECS VPC to items-ecs-vpc-sg
- Create the following security group and attach it to ECS VPC
Name: items-ecs-ec2-sg
- Inbound Rule: Allow all traffic from 10.0.0.0/8
- Outbound Rule: Allow all traffic to 0.0.0.0/0
Name: items-ecs-service-sg
- Inbound Rule: Allow all traffic from 10.0.0.0/8
- Outbound Rule: Allow all traffic to 0.0.0.0/0
Name: items-ecs-alb-sg
- Inbound Rule: Allow http traffic from 0.0.0.0/0
- Inbound Rule: Allow https traffic from 0.0.0.0/0
- Outbound Rule: Allow all traffic to 0.0.0.0/0
- Create rds database security group.
- Name: items-rds-sg
- Inbound Rule: Allow Postgres traffic from 10.0.0.0/8 Port 5432
- Outbound Rule: Allow all traffic to 0.0.0.0/0
- Create transit gateway with Name: items-tgw. Disable Default route table association and Default route table propagation.
- Create a transit gateway attachment for items-ecs-vpc. Name: items-ecs-vpc-tgw-attach. Select all three Az and attach the following subnets to it.
- private-us-east-2a-ecs-tgw
- private-us-east-2b-ecs-tgw
- private-us-east-2c-ecs-tgw
- Create a transit gateway attachment for items-rds-vpc. Name: items-rds-vpc-tgw-attach Select all three Az and attach the following subnets to it.
- private-us-east-2a-rds-tgw
- private-us-east-2b-rds-tgw
- private-us-east-2c-rds-tgw
Create transit gateway route table for items-ecs-vpc. Name: items-ecs-tgw-rtb
Create transit gateway route table for items-rds-vpc. Name: items-rds-tgw-rtb
Edit items-ecs-tgw-rtb and associate items-ecs-vpc-tgw-attach to it.
Edit items-rds-tgw-rtb and associate items-rds-vpc-tgw-attach to it.
Edit items-ecs-tgw-rtb and propagate to items-rds-vpc-tgw-attach to it.
Edit items-rds-tgw-rtb and associate items-ecs-vpc-tgw-attach to it.
Edit private-items-rds-rtb, add route to send traffic going to 10.0.0.0/8 to items-rds-vpc-tgw-attach
Edit private-items-ecs-rtb, add route to send traffic going to 10.0.0.0/8 to items-ecs-vpc-tgw-attach
Edit public-items-ecs-rtb, add route to send traffic going to 10.0.0.0/8 to items-ecs-vpc-tgw-attach
Video for entire steps
Step 3: Database Setup
- Create parameter group. Name: items-rds-pg
- Create subnet group. Name: items-rds-sg
- Create rds cluster. Name: items-rds-db. Whiles creating the cluster, make sure to add the database name (items)
Video for entire steps
Step 4: ECS Cluster Setup
Video for entire steps
Step 5: Application Deployment (awsvpc network mode)
Video for entire steps
Step 6: Application Deployment (bridge network mode with dynamic port mapping)
Video for entire steps
Assignment
- Deploy the entire solution with an infrastructure as code preferred (Terraform/terragrunt | AWS CLI | Cloud Formation | CDK).
- Setup CICD Pipeline to deploy application to ECS preferred (Github Actions, Gitlab, Azure DevOps Yaml Pipeline, Jenkins)
- Design very detailed cloud architecture diagram showing all components that get deployed such as vpc, security groups, nacl, subnets, etc..
- Document the entire solution.
- Push your assignment in github and share the link in our discord channel.